
Janell and I first saw the canoe on July 4th, 2023. We were in town for a few rushed days between paddling the Apostle Islands in Wisconsin and paddling the Sunshine Coast in Canada.

Robin, Matthew’s mom, told us about the canoe Matthew started in high school and left in the garage. It was time for this boat to transition. Either finish it, or burn it. Just get it out of the garage.
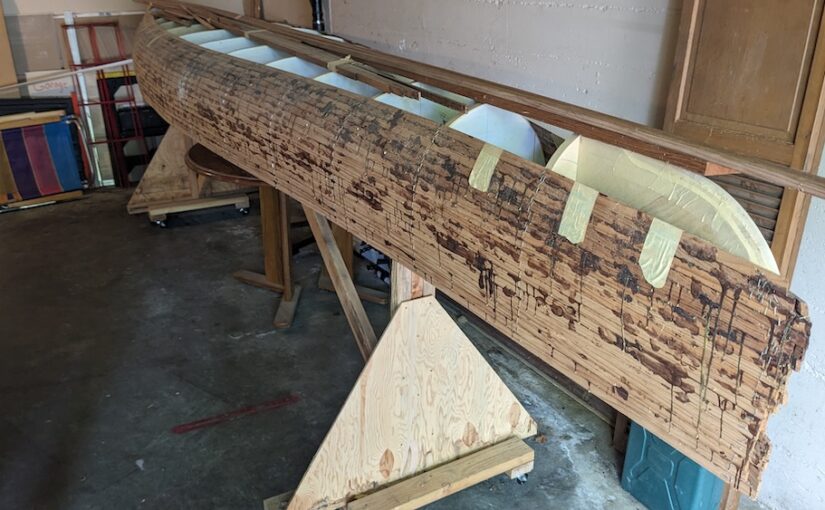
We visited the boat between other getting-ready-to-go tasks and could see the shape of an emerging canoe. We noticed it was attached to a substantial strong back. It was not something we could easily move.
We told Paul, Matthews’ dad, that we were interested, couldn’t take it right now, and would have to figure out some logistical issues. We walked back to the car, excited but puzzled.
Logistical Issues
This was the first time Janell and I looked at each other and said …
We’ll figure this out
A project like this isn’t something you start with the assumption that you know everything and can plan for everything. It’s a jump off a diving board. It’s a long trip in the wilderness. It’s accepting the truth you aren’t in control. I guess it’s a faith journey.
Shelter
We needed a workshop sheltered from rain, cold, and bird droppings. We explored using a ten-foot by twenty-foot canopy, but found that our yard and driveway is too narrow or too short. With a seventeen-foot boat, you need space for the full twenty-foot canopy.
Janell and I debated how much of an imposition we would be if we worked on the canoe in Paul’s garage. Only Paul knew, so we asked him if we could finish the job of attaching cedar strips to the strong back in his garage. He said that would be fine and gave us the door code. huzzah! We had a temporary home and motivation to finish this project.
(notice how I avoided titling this section “Gimme Shelter.” You’re welcome.)
Random Orbital Sanders
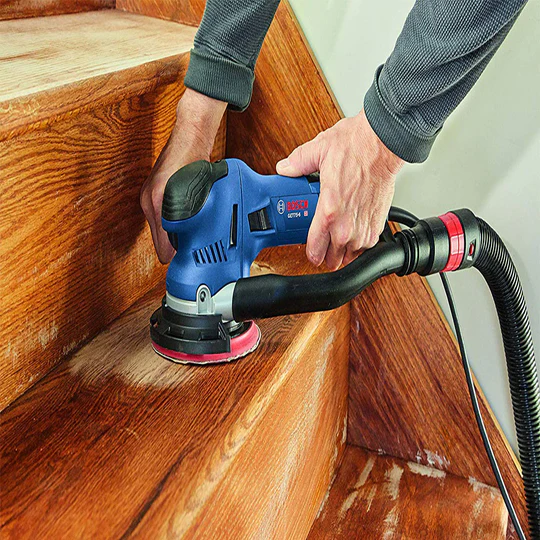
That is such a cool name for a tool. Kind of like a Proton Pack or a Sonic Screwdriver. These special sanders move the sandpaper in random circles to avoid predictable patterns. Plus, they are easy on the hands. Old-style sanders just move back and forth, sending all that vibrational goodness right into your tendons and muscles. Ouch.
We needed random orbital sanders with vacuum attachments. Cedar dust isn’t something you want to inhale, so a dust control system was essential. We looked at (very expensive) Festool sanders, but the price tag gave us pause. If we bought them, we would use them once, then forever store them in the basement.
Our friends Jeff and Peggy graciously loaned us two Bosch sanders. Megan and Brian loaned us another shop vac. We cleaned our shop vac, hooked it up, and problem solved. Thanks Jeff & Peggy and Megan and Brian!
Bead and Cove
Each strip in the canoe is in contact with the previous strip. Joining them edge to edge would be simple, except there is nothing square about a canoe and the strips swerve around like a drunken monkey, starting at the bow, curving out to match the middle, twisting to account for the curve of the boat, then back to the stern.
All of this three-dimensional twisting means you must do something to adjust the fit of the edges of the strips. If you do a good job , they fit tightly. If you do a poor job, you get gaps. Gaps are bad. You don’t want gaps.
There are two approaches to removing gaps: planing the boards to fit, or bead and cove.
Planing (not planning)
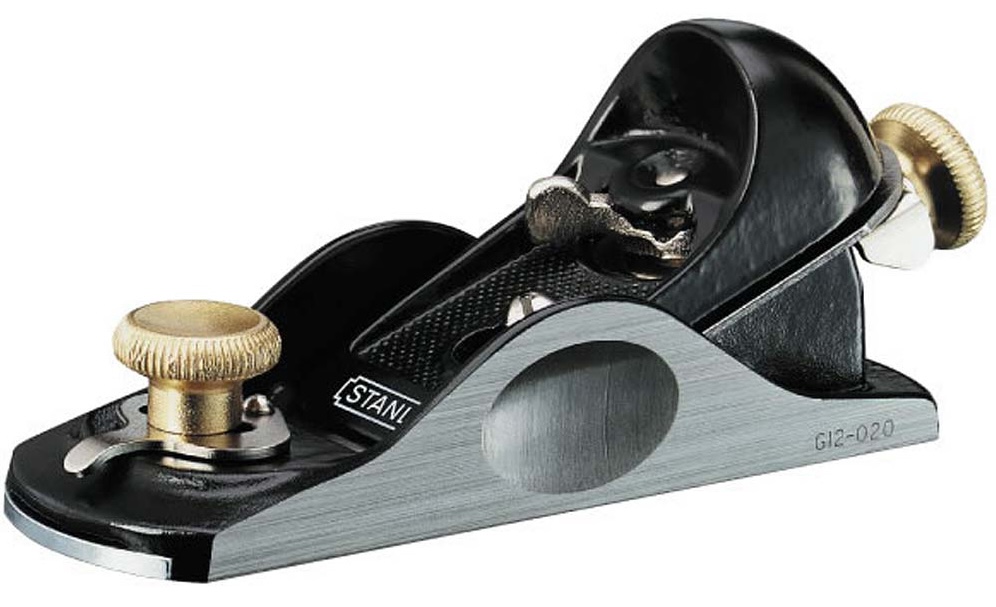
Matthew did this on the first part of the boat by setting each strip on edge, then using a block plane to set the angle to match the previous strip. It’s called a butt joint. Planing the edge to match the previous edge is an art. You can’t use a T-Square and each strip is different. You just noodle through and after twenty (fifty?) strips, you develop a knack for creating the right edge.
Bead and Cove
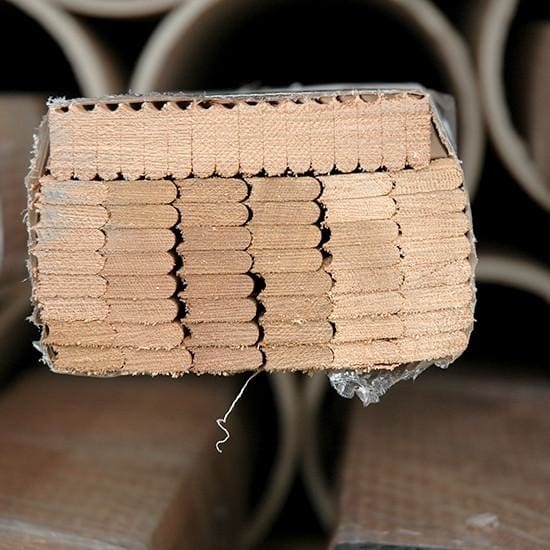
Instead of planing each edge, you can change the strips to nest together. On one edge, use a router to create a concave edge (bead). On the other edge, convex (cove). Here’s the edge of a bundle of professionally milled bead and cove strips. Notice how nicely the bead of one strip fits into the cove of the next. This produces a tight joint without gaps and provides a clever way of twisting around the dips and curves of a canoe. We didn’t know you could buy these bundles of professionally manufactured bead and cove. If we had known to look, we would have gasped at the price.
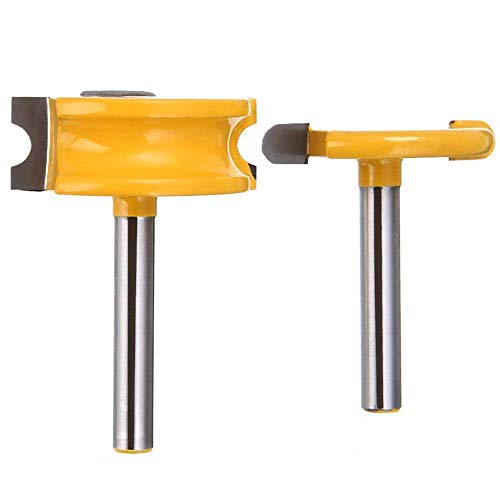
Our friend Mick loaned us his bead & cove router set-up. One bit has a concave edge, the other has a matching convex edge. Mick purchased two routers and built them into jigs. To prep the strips, you run them through the router jig with the bead bit, then run it through the other with the cove bit. Here’s Janell running a strip through the bead jig.
This is touchier than we thought. The router bits must be the right size and accurately aligned with the thickness of the strip. If the cove is too deep or misaligned, the edges will break off. If the bead is too aggressive, the width of the strip will be uneven. To get it right probably takes about twenty (fifty?) attempts.
Either way, our only choice is to proceed with undeserved optimism. If we knew how much we didn’t know, we would never have started. Good thing we started, or this beautiful canoe wouldn’t exist. There’s a life lesson for your personal diary.
The Football

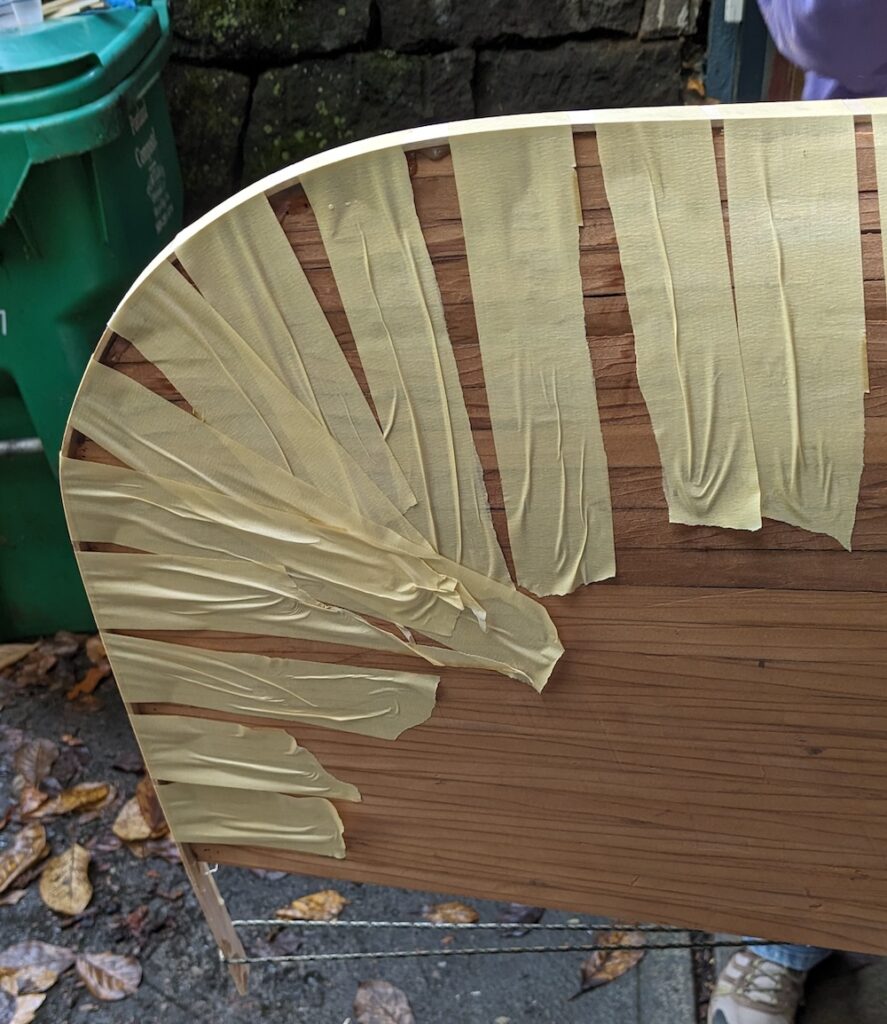
Each strip goes all the way from bow to stern. The shape of the canoe emerges as the strips are glued edge-to-edge. It starts at the gunnels, moves up the side, and around the bilge, creeping up to the keel. But this leaves a non-square opening; seasoned wood-strip canoe builders call this the football. The strips shorten and the ends need to be shaped to a matching point.
There are different ways to solve this problem. We chose the traditional shrinking diamond. Other builders create intricate shapes or cross-hatches or inlays or swirly-doos. The buoyancy and performance of the boat is the same no matter what you choose. Decide, accept the imperfections, proceed boldly.
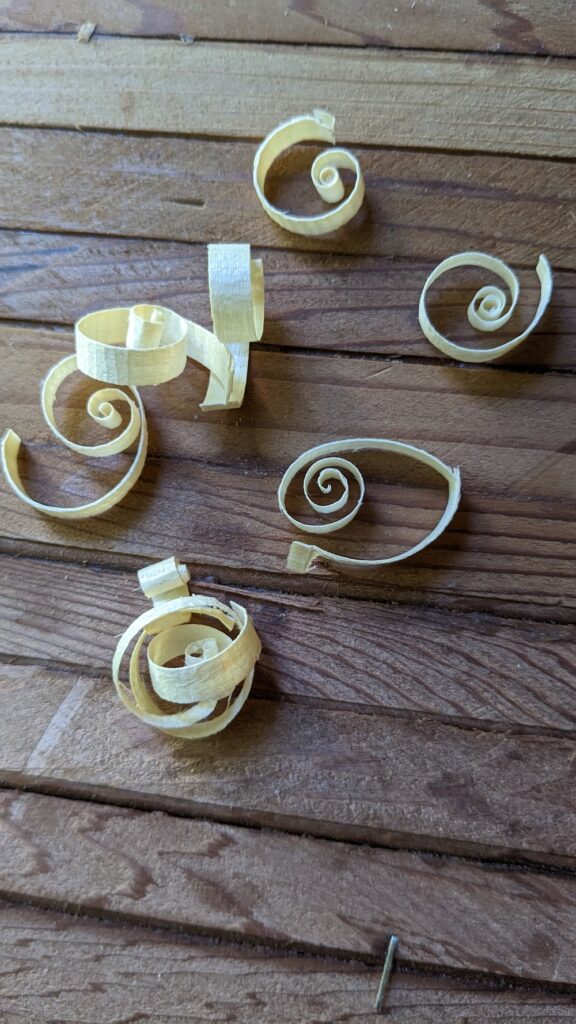
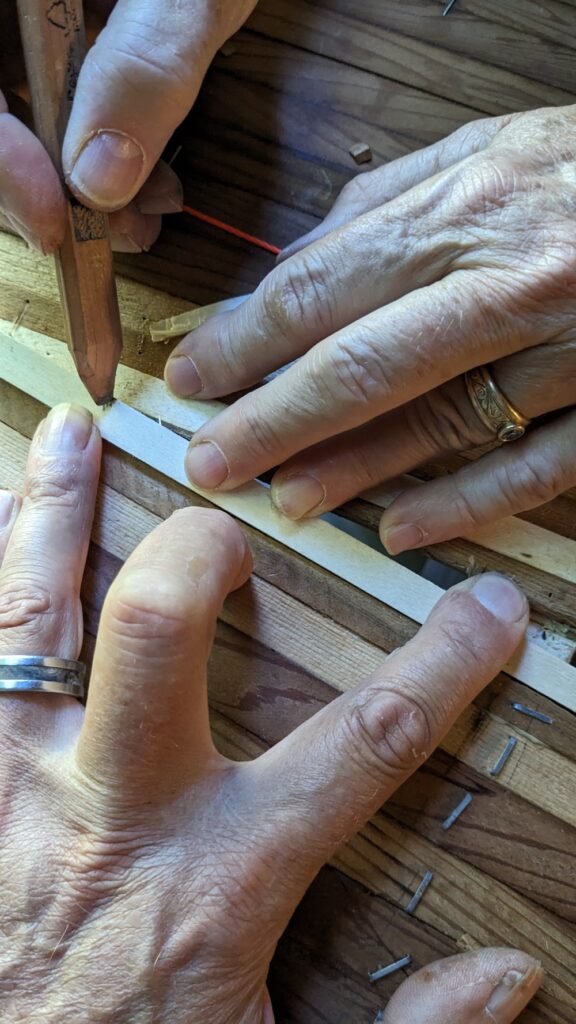
In our football, each piece needs to be exactly the right length and exactly the right taper. We would mark the last place the strip would be full width, then the length, then use a block planer and carefully shave it to the right size.
Planing a strip is an aesthetic task. If you move against the grain or set the blade too deep, the wood will chatter and the plane will leave gouge marks. But if you go with the grain and adjust the tool correctly, your reward is a smooth sound and handsome little curls of wood.
Our Football
We were running out of long cedar strips and coming down to the shorter pieces or imperfect strips. Not a problem, because we only needed shorter strips for the football. But stretch our supply in whatever creative ways possible, we still ran out. Peggy and Jeff came to the rescue again; they had strips left over from their projects and graciously donated to our canoe.
The strips they donated were white cedar. We were using red cedar. So the strips were of different colors. We played around with different patterns and settled on an alternating light-dark layout. (Later on, we found this to mirror the color and shape of the gunnels!)
By now, we had also given up on bead and cove. Too many of the strips we had run through the router had lost the edges of the cove. It was just as easy to hand plane and finesse a butt joint.
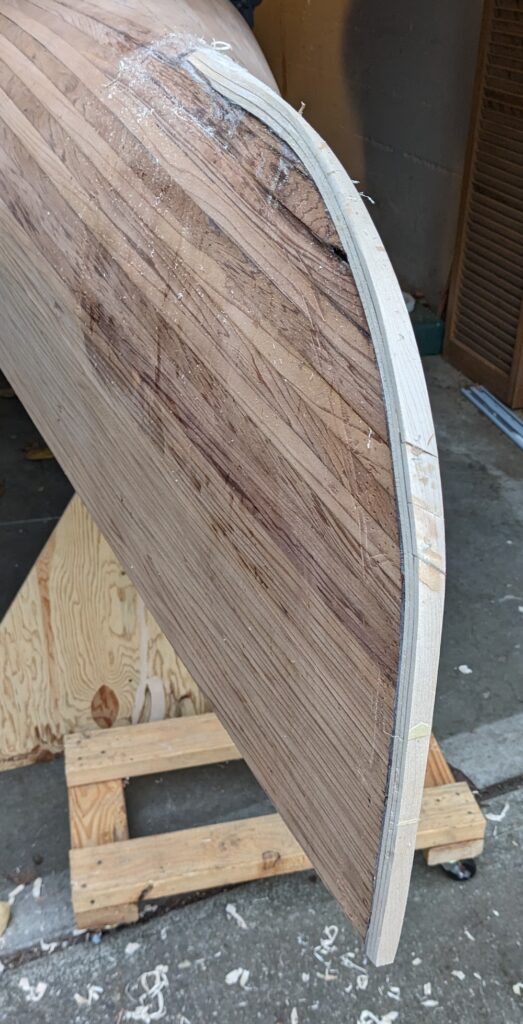
Bow and Stern Stems
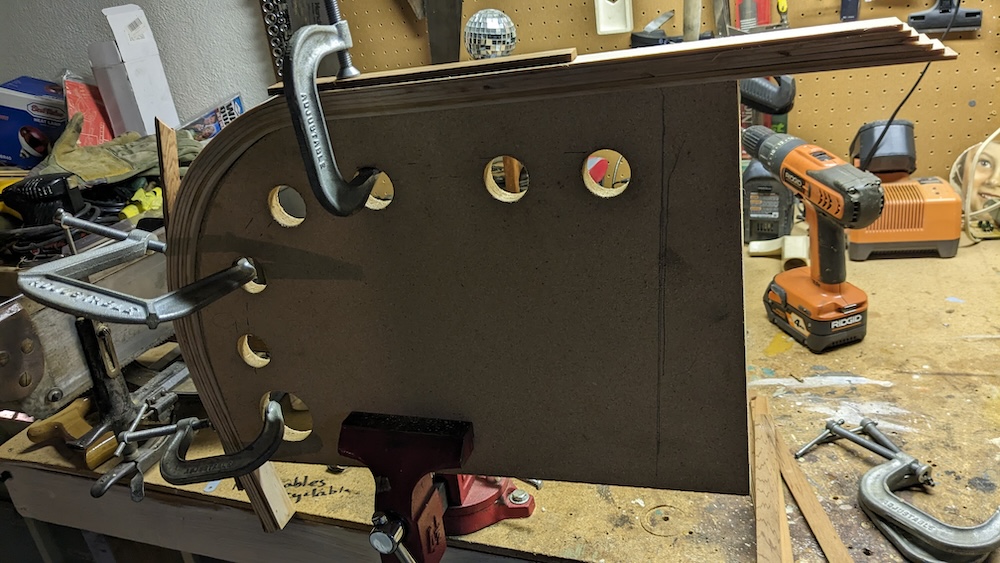
The bow and stern stems are the final part of a cedar strip canoe and made out of thin strips of spruce. Soaking the strips in hot water softens the wood fibers; bending the strips around a plywood form gives them the proper shape.
Take the stems off the form, then glue them to the form, one at a time, creating a laminated piece of spruce in the shape of the bow and stern.
This is where we made a mistake, but didn’t realize it was a mistake until we tried to take the canoe off the strongback. There was a layer of masking tape on the tops of all the forms, but we should have placed multiple layers of wax or butcher paper between the strips and the form. Instead, and accidentally, we glued the stem directly to the form. Oh misery. But for now, we are oblivious and happy.
Once the stem is glued, we can plane it to a more graceful shape. While Janell is sanding the boat with fine sandpaper, I’m using the block plane to shape the spruce laminate. I get it mostly right, but there are ridges at bow and stern. We’ll remove these before we place the fiberglass so the canoe has an uninterrupted flow from bow to stern.

We’ll Figure This Out
This is where we were just prior to bringing the canoe (and strongback) up to Port Townsend. We got here because we kept making mistakes, shrugging our shoulders, fixing the problem as best we could, and moving along.
Ironically, the title of the post I wrote when we arrived in Port Townsend is “Did you think this through?” We did – but sometimes you just don’t have enough information available to make the best decision you’d make when you’re better educated.
Like I said; it’s a faith journey.